

For some time now I’ve been irked by the way my images appear on Instagram after I upload them from my computer. On first glance they look fine on the small iPhone screen, but when I zoom in I noticed the resolution is poor and the image lacks much of the fine detail I see on my 27 inch colour calibrated monitor!
Over the last several months I’ve searched the web for answers to this issue and discovered this is a very common complaint! There are masses of webpages and YouTube videos outlining the best way to upload photos to Instagram in order to maintain the best quality.
Beyond the need to maximize screen “real estate” with a 4 x 5 portrait profile, much of the commentary focuses on how Instagram compresses large files in order to host the many millions of images that appear on the app every day. There is a spirited debate on various websites about what image size is best to export to Instagram (the recommended 1080 pixels wide versus larger dimensions!).
When I first started posting photos to Instagram I was convinced the best method would be to export straight from my Lightroom catalog to the IG app. Initially, I used a free plug-in I found on the web for linking Lightroom to Instagram and this seemed to work well in that I could compose captions and hashtags in Lightroom and these would seamlessly link to the the uploaded shots on my Instagram account. When this plug-in ceased to work I moved onto another method I found on the web using the developer tools option in Google Chrome to upload files from my computer straight to Instagram. This meant I didn’t need to send the photo file to my phone and I assumed that once I’d set up the ideal settings in Lightroom’s export function all would be fine in terms of optimal image quality in the uploaded file.
Well how wrong I was!
Despite tweaking the various image quality settings in Lightroom’s Export module, the uploaded images on Instagram continued to underwhelm me, particularly when I compared them to other IG accounts I was following . Clearly something was wrong with my workflow and my curiosity was further peeked by a neat YouTube video by UK landscape photographer Nigel Danson in which he outlines how he posts to Instagram stressing a much higher image size setting in LR (3500 x 3500 pixels) and also exporting to his phone before uploading.
So I decided to try an experiment and set up a second IG account to upload one of my favourite images with different export options. The key variables here included:
- different sharpening settings in LR Export (standard versus high);
- different image size in LR Export (3500 pixels versus 1080 pixels width);
- upload direct from computer versus export to iPhone/Snapseed for upload
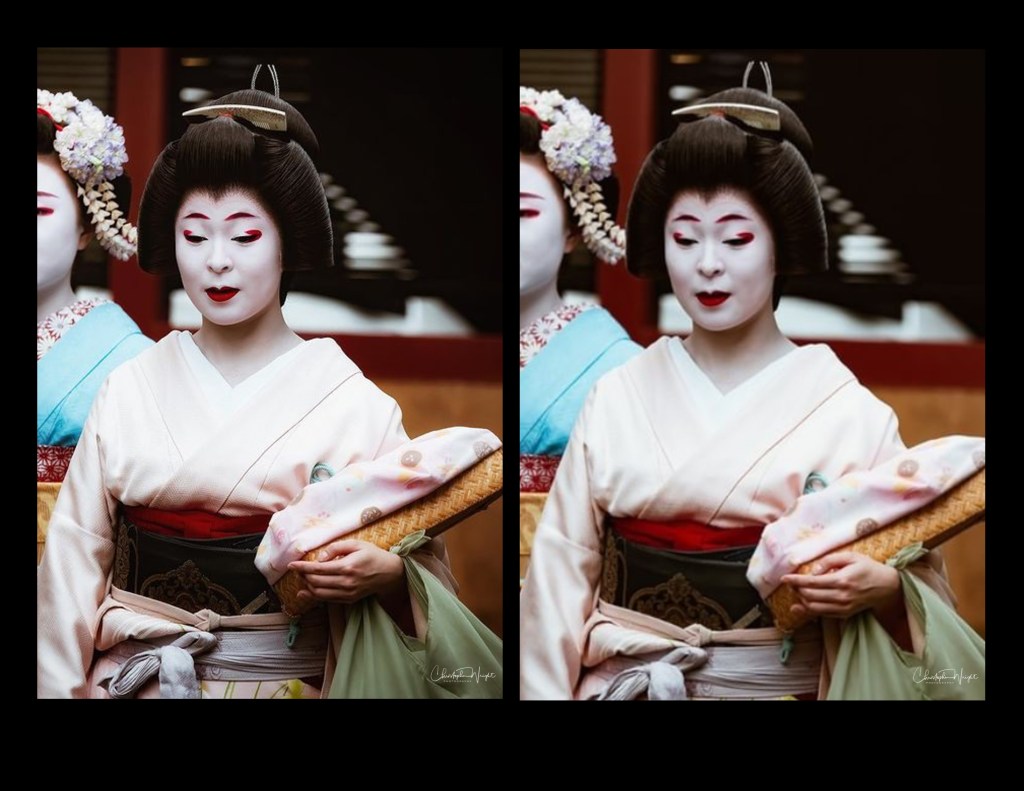
This resulted in 8 copies of the same image (a portrait shot of a geisha and maiko walking along a street in Kyoto) with different uploaded image sizes, sharpening settings and upload methods which I could then compare on the new IG account.
Having uploaded the images to the new account, I eagerly scrolled through them on my iPhone and was shocked by what I was seeing! To my eyes there was no significant difference between the images exported with different image sizes or sharpening. However, as you can see below, there was a marked difference between the images uploaded to IG direct from my computer (poor resolution – right) versus those exported from the computer to the iPhone and then uploaded to IG (much clearer resolution – left)!
No doubt there is a valid reason for why this happens, but having seen the difference myself with the same image and controlling for the various options, in future I will (despite the added hassle) make sure I upload all my IG posts via my phone.
So my new LR to IG workflow goes as follows:
- Edit image in Adobe Lightroom and Photoshop as desired and crop to optimum IG format (e.g. portrait at 4 x 5 aspect ratio);
- Use Lightroom’s Export tab maximizing image size and resolution (see image below for settings);
- Send image file to iPhone via Dropbox or Airdrop;
- Open image on iPhone with Snapseed for final edit;
- Post image on Instagram direct from iPhone photos.

If you’re interested in the full workflow for uploading from Adobe Lightroom to Instagram, I thoroughly recommend Nigel Danson’s YouTube video below which sets it all out really well!

Thanks Christopher, that is a very helpful blog!
LikeLiked by 1 person
David,
No worries – glad it was informative! This workflow from phone to IG after processing makes a world of difference to the quality of the IG displayed image I’ve found! 😉
LikeLike